

 Before using your ARCHOS for
the
first time, completely charge its
battery. Connect the supplied USB
cable to the ARCHOS and to a running
computer or a USB power adapter (available in most
electronics stores). The
ARCHOS will turn on and start charging. It will ask if you want to
"mount" the device or "Charge only." Select "Charge only."
The battery icon in the upper right corner of the screen will animate a
green “filling”
action and the power/charge indicator light next to the USB connector
will remain solid. Once the device is completely charged, the indicator
light will start blinking. When not plugged into a computer or
power adapter, the icon will display the percentage of battery power
available. Before using your ARCHOS for
the
first time, completely charge its
battery. Connect the supplied USB
cable to the ARCHOS and to a running
computer or a USB power adapter (available in most
electronics stores). The
ARCHOS will turn on and start charging. It will ask if you want to
"mount" the device or "Charge only." Select "Charge only."
The battery icon in the upper right corner of the screen will animate a
green “filling”
action and the power/charge indicator light next to the USB connector
will remain solid. Once the device is completely charged, the indicator
light will start blinking. When not plugged into a computer or
power adapter, the icon will display the percentage of battery power
available. |
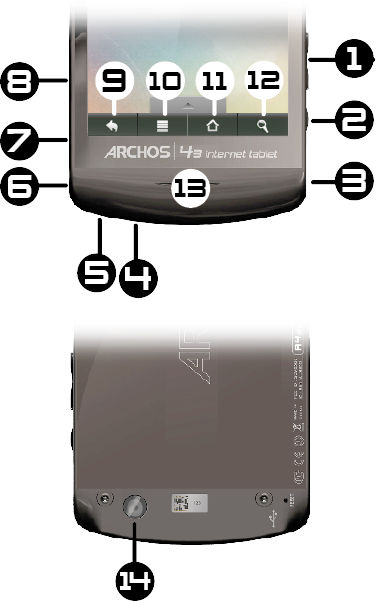 3.
Power/Charge indicator:
Without a power source connected, it shows the on/off status. While
connected to a power source (USB
cable), blinking = fully charged, solid =
currently charging, quick blinking = battery too low to start (let
charge for another 30 minutes).
3.
Power/Charge indicator:
Without a power source connected, it shows the on/off status. While
connected to a power source (USB
cable), blinking = fully charged, solid =
currently charging, quick blinking = battery too low to start (let
charge for another 30 minutes). Menu list: By tapping on the menu
icon, you can see the available options for the
current screen.
Menu list: By tapping on the menu
icon, you can see the available options for the
current screen.  Search: Brings up the quick search
box which will
search for key words within the specific application or on
the Internet (provided there is an active Internet connection). What is
searched for can be configured in Settings > Search.
Search: Brings up the quick search
box which will
search for key words within the specific application or on
the Internet (provided there is an active Internet connection). What is
searched for can be configured in Settings > Search.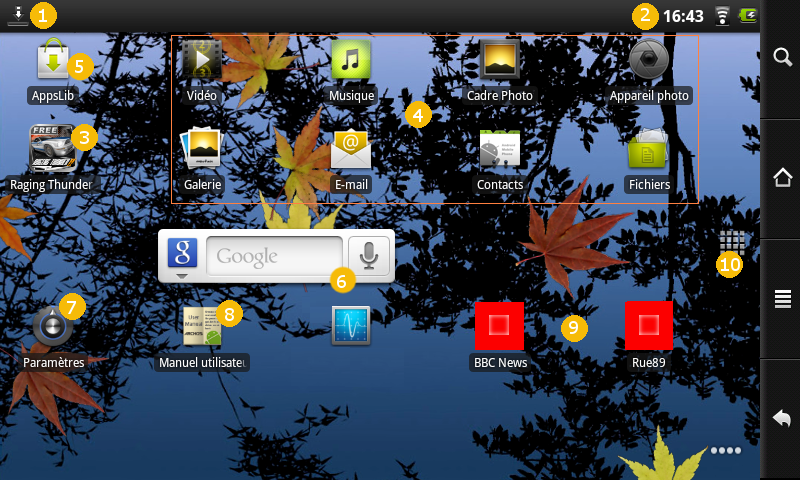 The Android™ interface is
made up of five home screen panels (the
home icon
The Android™ interface is
made up of five home screen panels (the
home icon  .
and then select Wallpapers.
.
and then select Wallpapers.When you do not need the WiFi or
Bluetooth® connections,  remember to
deactivate them in order to save battery power.
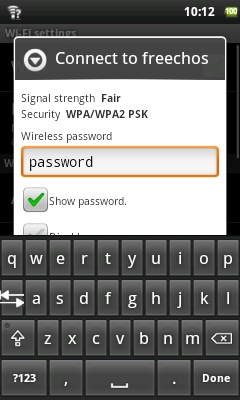
The Power control widget
found on the far left home screen allows you to turn the WiFi on and
off (WiFi, Bluetooth®*, Tethering,
Sync, Brightness) as needed. To configure
a WiFi connection, you need to be in a WiFi zone that will allow you to
connect to it. Every time the ARCHOS is in range of a network that you
have
already configured once, it will attempt to make a connection (so long
as the WiFi setting is enabled). remember to
deactivate them in order to save battery power.
The Power control widget
found on the far left home screen allows you to turn the WiFi on and
off (WiFi, Bluetooth®*, Tethering,
Sync, Brightness) as needed. To configure
a WiFi connection, you need to be in a WiFi zone that will allow you to
connect to it. Every time the ARCHOS is in range of a network that you
have
already configured once, it will attempt to make a connection (so long
as the WiFi setting is enabled). |
 In order to improve your
device’s WiFi reception, avoid placing your fingers in front of the
WiFi antenna area (zone in red). In order to improve your
device’s WiFi reception, avoid placing your fingers in front of the
WiFi antenna area (zone in red). |
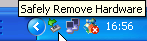 and select the ARCHOS.
 then
then  on the desktop toward the
trash (which will change to an "unmount" icon) and drop it in.
on the desktop toward the
trash (which will change to an "unmount" icon) and drop it in. and select "unmount" or "safely
remove."
and select "unmount" or "safely
remove."|
to access more
options within one of the settings. |
 that appears when you move the page.
Depending on where you are
in the web browser, holding down on an item will give you access to
more options. For example, by holding your finger on an image,
you
can save the image file to your device. To fill in a text field, tap in
the field, then use the virtual
keyboard to type the required information.
that appears when you move the page.
Depending on where you are
in the web browser, holding down on an item will give you access to
more options. For example, by holding your finger on an image,
you
can save the image file to your device. To fill in a text field, tap in
the field, then use the virtual
keyboard to type the required information.
Bookmarks:
You can also just tap on the bookmark
icon on the top right of each page. Here you can see your list of
bookmarks. Just tap on one
of them to open it in the current window.  Holding down on a bookmark
will give you access to several options (you will be able to edit it,
rename it, delete it, etc.). To add a new bookmark, tap on the top left
box that shows *
Add. The two other tabs allow you
to access your Most
visited sites and your History. In the History tab, the
Menu icon allows you to clear the history. Holding down on a bookmark
will give you access to several options (you will be able to edit it,
rename it, delete it, etc.). To add a new bookmark, tap on the top left
box that shows *
Add. The two other tabs allow you
to access your Most
visited sites and your History. In the History tab, the
Menu icon allows you to clear the history. |
Select one of the categories and then browse through the various applications to find the one you want and then tap on the Install button which will download it to your device. You can then just tap on Open to run the program. These applications have been created by the Android™ software developers' community and made available on an "as is" basis. |
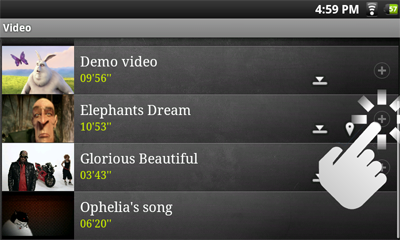 Each line contains a thumbnail
from the video, the total
play time, a Resume
icon Each line contains a thumbnail
from the video, the total
play time, a Resume
icon  if it was last
stopped before it was completely viewed, a Bookmark icon if it was last
stopped before it was completely viewed, a Bookmark icon |
ARCHOS 43 Technical Specifications MPEG-4 HD (up to 720p, 30 fps@12Mbps) MPEG-4 (ASP@L5 AVI, up to DVD resolution, 30 fps@12Mbps H.264 HD (HP@L3.1 up to 720p, 30 fps@7Mbps) WMV9/VC1 (AP up to 720p 30 fps@10Mbps) MJPG (Motion JPEG) in VGA resolution With the above codecs, the device can play video files with the following extensions: AVI, MP4, MOV, 3GP, MPG, MKV, FLV, RM, RMVB, ASF, WMV. With the optional Cinema plug-in: MPEG2 (up to DVD resolution MP/D1, 30 fps@15 Mbps). Plays VOB, TS, PS. Video subtitle support SRT, SSA, SMI, SUB text subtitles, MKV embedded subtitles (TXT, SSA), VOB embedded subtitles |
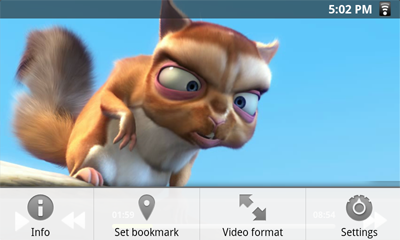
 To
display the menu overlay, tap once anywhere on the screen. You can use
this to pause/resume the video or to move to a specific part of the
video. To
make it disappear, tap again. To display the available menu items
including alternate languages*, subtitles*, bookmarks, and settings,
tap on the menu icon .
To exit the video player at any time, tap on the back icon To
display the menu overlay, tap once anywhere on the screen. You can use
this to pause/resume the video or to move to a specific part of the
video. To
make it disappear, tap again. To display the available menu items
including alternate languages*, subtitles*, bookmarks, and settings,
tap on the menu icon .
To exit the video player at any time, tap on the back icon * Only if multiple audio tracks or subtitles are included inside or alongside the video file. |
 If there are computers on your WiFi
network that are sharing folders,
then you will be able to browse those folders and play whatever content
is in them. As shown to the left, a folder on your PC that is
being shared has the hand-holding-a-folder icon. To share a
folder on your PC, right-click on it and select Sharing. You can browse all the
shared folders by using the Files
application on your ARCHOS. In the file browser, find the group External and
select Shared
folders (SMB).
You'll see the computer's name here, and then the shared folders
and files inside it. If you have shared video or music files, you
can access these folders directly from the Video
application (select Shared Folders (SMB)
from the list when you first open the video player) or the Music
application (select the icon Storage on the
right side). For photos, you will have to use the Files
application to locate and display your photos. If the
computer with the shared folders normally has a Windows® username and
password, you will be asked to enter these before you can access the
folder contents.
If there are computers on your WiFi
network that are sharing folders,
then you will be able to browse those folders and play whatever content
is in them. As shown to the left, a folder on your PC that is
being shared has the hand-holding-a-folder icon. To share a
folder on your PC, right-click on it and select Sharing. You can browse all the
shared folders by using the Files
application on your ARCHOS. In the file browser, find the group External and
select Shared
folders (SMB).
You'll see the computer's name here, and then the shared folders
and files inside it. If you have shared video or music files, you
can access these folders directly from the Video
application (select Shared Folders (SMB)
from the list when you first open the video player) or the Music
application (select the icon Storage on the
right side). For photos, you will have to use the Files
application to locate and display your photos. If the
computer with the shared folders normally has a Windows® username and
password, you will be asked to enter these before you can access the
folder contents. 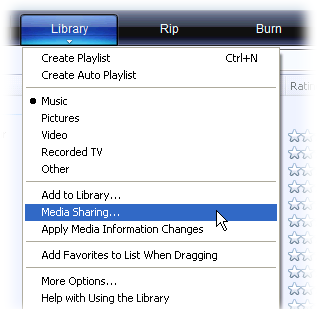 1.
Connect the ARCHOS to
your WiFi network (see Making
a WiFi
Connection). 1.
Connect the ARCHOS to
your WiFi network (see Making
a WiFi
Connection).2. Connect your PC to the same WiFi network and start Windows Media® Player, version 11 or higher. 3. Click on the Library tab, and select Media sharing... 4. Check the box Share my media to, and click on OK. The ARCHOS icon should appear in the window, with a warning symbol next to it*. * ATTENTION: the first time you set your sharing options, it might take a couple of minutes for your PC to display the ARCHOS icon. |
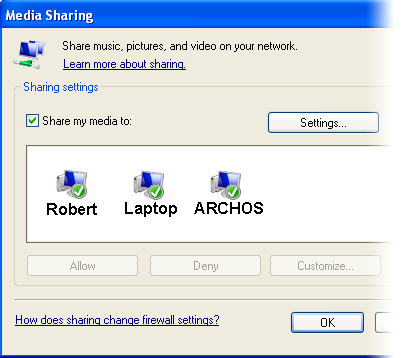 5. Select the ARCHOS icon and click on the Allow button. 6. To modify your sharing settings, click on Settings. You can, for example, enter a name for your shared media files. You will then see this name on your ARCHOS. Click on OK to save the modifications. 7. Click on OK to close the Media Sharing window. 8. You can now close Windows Media® Player, and start viewing your PC’s shared media files directly on your ARCHOS (see next section). |
 .
.
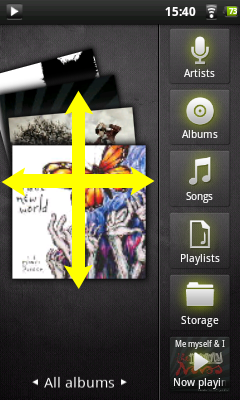 Here
you see the music library screen with the cover-roll album art display
on the left. Scroll the albums vertically to see all the albums
stored on your device or scroll it horizontally to see your Favorites, Recently added, Recently played,
or All albums.
If your music files do not include cover art, then a standard cover
icon will appear. Here
you see the music library screen with the cover-roll album art display
on the left. Scroll the albums vertically to see all the albums
stored on your device or scroll it horizontally to see your Favorites, Recently added, Recently played,
or All albums.
If your music files do not include cover art, then a standard cover
icon will appear. You can browse through your music by album, artist, or song name, via your created play lists, your favorites, or as files and folders in the storage* system. If some of your music files do not contain information tags, they will be classified as (Unknown) in the Music Library. If not already present, the music player widget can be placed on one of the five home screens to give you quick access to your recently added and recently played music. * In addition to the internally stored music, you will see the option External in Storage. This allows you to play music from media servers or from a file server over your WiFi network. |
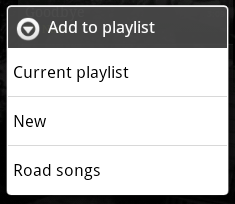 A
playlist is a list of audio tracks that the music player will
automatically play one after the other (in order or randomly). You can
play, create and edit as many playlists as you
want. To create or add to a playlist, find a song or an
album in the
music browser and hold your finger down on it to bring up the list of
options. Select Add
to playlist, and then you have the option of putting it into an
already established playlist or creating a new play list. A
playlist is a list of audio tracks that the music player will
automatically play one after the other (in order or randomly). You can
play, create and edit as many playlists as you
want. To create or add to a playlist, find a song or an
album in the
music browser and hold your finger down on it to bring up the list of
options. Select Add
to playlist, and then you have the option of putting it into an
already established playlist or creating a new play list.When you delete a playlist (hold your finger down on the name of playlist then select delete), you are only deleting the list and not the music itself. |
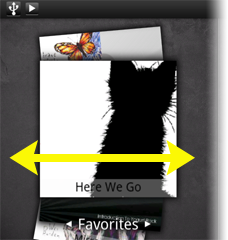 The "Favorites" is where you keep the
music you play the most often. To add
a title, an album, or an artist to your favorites list, just
hold down on the item and a few options will appear. Choose Add to
favorites. The item will be marked with a star icon The "Favorites" is where you keep the
music you play the most often. To add
a title, an album, or an artist to your favorites list, just
hold down on the item and a few options will appear. Choose Add to
favorites. The item will be marked with a star icon |
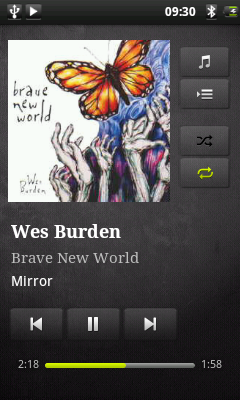 The
music playback screen includes the standard playback controls.
You can tap on the progr The
music playback screen includes the standard playback controls.
You can tap on the progr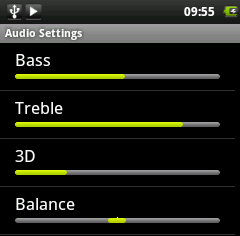 ession bar to
go directly to a different
location in the song. The previous and next buttons can be tapped once
to jump to the
beginning of the current song or jump to the next song, or held down to
reverse or advance rapidly through the current song. The icons to the
right of the album cover do the following: ession bar to
go directly to a different
location in the song. The previous and next buttons can be tapped once
to jump to the
beginning of the current song or jump to the next song, or held down to
reverse or advance rapidly through the current song. The icons to the
right of the album cover do the following:- Switch to the music selection screen - View the current play list* - Choose between repeating all songs in the current list, just one, and not repeating. Using the menu ,
you can choose additional items such as the Audio Settings
(shown to the right) or Party Shuffle.
Selecting the party shuffle will create a playlist of several songs
from the entire music library. The idea is that while the list is
playing, you can add more songs (find the desired song, long hold on
the item, and then select Add to playlist
> Current
playlist) and it will add it to the end of the current party
shuffle. Or, if you do nothing, the player will just add songs as
needed to keep the party going.* In the list, it is possible to change the position of the upcoming songs by holding down on the icon on the left of the song and dragging it to the desired position. |
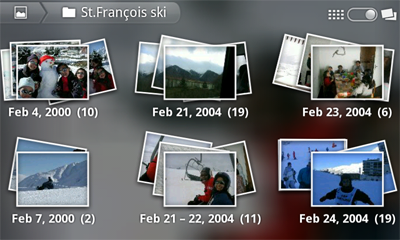 The
gallery organizes your photos for you by the folders you have put
them into and by the date the
photos were taken. This includes both the
photos and videos you have taken with the built-in
camera or photos
you have
copied onto the ARCHOS. The initial gallery view shows all the
albums (folders) that contain photos. Flick the albums to the left or
right to find the one to view, and then tap on it to see a photo wall
of its contents. If not already present, the photo widget can be placed on one
of the five home screens to give you quick access to your recently
added, recently played, and favorite photos. The
gallery organizes your photos for you by the folders you have put
them into and by the date the
photos were taken. This includes both the
photos and videos you have taken with the built-in
camera or photos
you have
copied onto the ARCHOS. The initial gallery view shows all the
albums (folders) that contain photos. Flick the albums to the left or
right to find the one to view, and then tap on it to see a photo wall
of its contents. If not already present, the photo widget can be placed on one
of the five home screens to give you quick access to your recently
added, recently played, and favorite photos. |
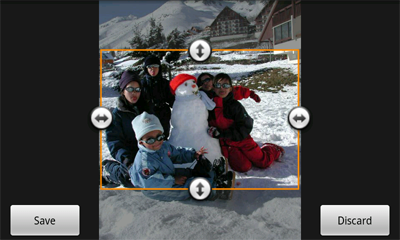
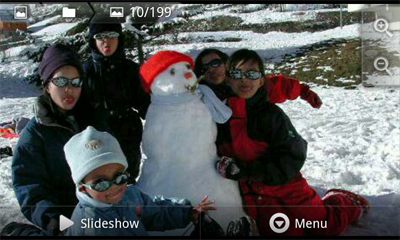
| You can flick the photo wall to
the right or left to see a thumbnail of all the photos. 1. The name of the folder you are currently looking at. 2. Tap to view the album as a photo wall (shown) or as small stacks of photos (below) grouped by date. 3. Drag the date slider to go through the entire photo wall by date. 4. The date of the photos is displayed as you drag the slider. 5. Example of new pictures created with the cropping feature. |
and then on More.
Select Crop.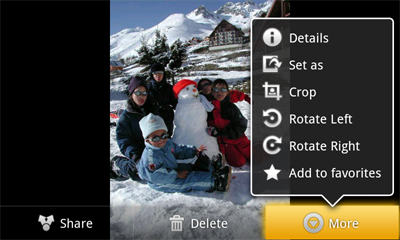
 e careful to
hold the device completely still in order to take photos that are crisp
and clear. To the right is the screen for taking still pictures
(and which is the same for taking videos). e careful to
hold the device completely still in order to take photos that are crisp
and clear. To the right is the screen for taking still pictures
(and which is the same for taking videos).1. Settings tab. Tap on this (or tap on the menu icon then Settings) to access the various camera settings (color effect, burst mode, picture quality, etc.). 2. Last photo or video made. Opens a view to inspect the last photos or videos that you made. 3. Switch between video camera and still image camera. 4. Take a photo or start/stop a video sequence depending if you are in photo or video camera mode. |
| .
For folders with many files, you can "flick" the list and it will
scroll up or down quickly. |
If
there are Windows® computers on your WiFi network, you can browse their
shared folders. Make sure you have a WiFi connection and in the
application Files,
select Shared
folders (SMB).
If there are computers on the same network that are sharing folders,
then you will see the computer's name here, and then the shared folders
and files inside. You can copy files and folders from the computer
sharing them and then paste them locally into your device. If the
computer with the shared folders normally has a Windows® username and
password, you will be asked to enter these before you can access the
folder contents.
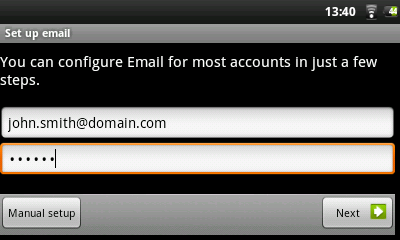 The Email and Contacts applications work hand in hand. These are standard email and contacts applications that you will need to set up yourself. You will need to check with your Internet service provider to find the parameters needed to set up both incoming and outgoing mail. Typically there are "Help" pages on service provider's website for setting up email for various email programs. This will give you the incoming and outgoing mail server names and other information that you will need to enter into the mail setup. If you have a Google Gmail™ account, the entire email setup only requires your user name and password. |
 This application allows you to view slideshows
of photo albums from Flickr®, Picasa™,
or Facebook accounts. Open the application and then tap on the bottom
area of the screen to display the available options. You can view a
slideshow
of the photos that are stored on the ARCHOS, from your own on-line
photo albums, on-line albums of others, or view selected photos by
keywords. This application allows you to view slideshows
of photo albums from Flickr®, Picasa™,
or Facebook accounts. Open the application and then tap on the bottom
area of the screen to display the available options. You can view a
slideshow
of the photos that are stored on the ARCHOS, from your own on-line
photo albums, on-line albums of others, or view selected photos by
keywords. |
 Sometimes
when you have been using
Android™ for a while, it may hold a
number of applications in active memory and slow down. You can stop
individual applications or stop all of them to give more space to
working memory. You can also see which applications are preventing the
device from sleeping or which ones are waking it up too often. Sometimes
when you have been using
Android™ for a while, it may hold a
number of applications in active memory and slow down. You can stop
individual applications or stop all of them to give more space to
working memory. You can also see which applications are preventing the
device from sleeping or which ones are waking it up too often. |
 Below are some
of the widgets that may already be on
your device. To add a widget,
find an empty area on one of the five panels and hold your finger down
there. Select Widgets, and
then select the desired one. To
delete a
widget from one of the screens, hold down on it and drag it toward the
applications tab where it will change to a trash icon. When the
widget is on top of the trash and turns red, let off of it and it will
be deleted (the same is true for any screen shortcut). To get more
widgets, go to the AppsLib store where you can
find free and purchasable widgets that add a variety of functions to
your ARCHOS.
Below are some
of the widgets that may already be on
your device. To add a widget,
find an empty area on one of the five panels and hold your finger down
there. Select Widgets, and
then select the desired one. To
delete a
widget from one of the screens, hold down on it and drag it toward the
applications tab where it will change to a trash icon. When the
widget is on top of the trash and turns red, let off of it and it will
be deleted (the same is true for any screen shortcut). To get more
widgets, go to the AppsLib store where you can
find free and purchasable widgets that add a variety of functions to
your ARCHOS.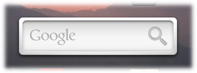 A quick way to enter a
search term for a Google Internet search. A quick way to enter a
search term for a Google Internet search. |
 A quick method to access your music
instead of opening the Music player.
There are also similarly looking widgets for the Gallery (photo
viewing) and the Video
player. A quick method to access your music
instead of opening the Music player.
There are also similarly looking widgets for the Gallery (photo
viewing) and the Video
player. |
 An
alternative clock. ,
select Settings,
and
choose About
device. Tap on the Firmware update
button. The ARCHOS will search on-line for a new firmware. If there is
one
available, it will start downloading, and it will be installed
automatically. Follow the on-screen instructions.
> Settings
> Repair
and Formatting). Then use the Touch screen calibration
button, and follow the
instructions on the screen. If this does not work or if you cannot
access the touch-screen settings,
you can force the touch-screen calibration (see: System Recovery).
An
alternative clock. ,
select Settings,
and
choose About
device. Tap on the Firmware update
button. The ARCHOS will search on-line for a new firmware. If there is
one
available, it will start downloading, and it will be installed
automatically. Follow the on-screen instructions.
> Settings
> Repair
and Formatting). Then use the Touch screen calibration
button, and follow the
instructions on the screen. If this does not work or if you cannot
access the touch-screen settings,
you can force the touch-screen calibration (see: System Recovery).
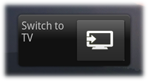  This
Audio/Video cable plugs into the ARCHOS to allow
it
to play video out to a television. Use the Switch to TV
widget (go here
to install the widget if it is not already on one of the home screens)
to
switch from watching
on the built-in screen to watching on a television. You can also use the menu button
to see the TV switch
option. Before you switch
to the TV, make sure you have switched your television to the correct
video input, often this is done with the A/V select button of your TV's
remote control. This
Audio/Video cable plugs into the ARCHOS to allow
it
to play video out to a television. Use the Switch to TV
widget (go here
to install the widget if it is not already on one of the home screens)
to
switch from watching
on the built-in screen to watching on a television. You can also use the menu button
to see the TV switch
option. Before you switch
to the TV, make sure you have switched your television to the correct
video input, often this is done with the A/V select button of your TV's
remote control. Screen as TouchpadOnce the screen image is displayed, use the screen of the ARCHOS as a track pad to move the cursor around the screen of your television. Be sure to orient the device as shown below in order to use the correct touch zones of the screen.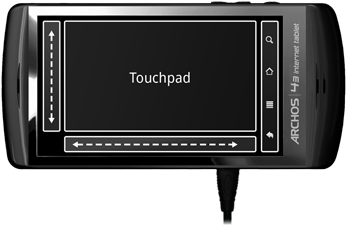 |